Archives for the month of: March, 2016

Last week I talked about how I used UDP to open up a TCP socket to send a file to the client. This week I did some more testing and it turns out that I don’t need to open up TCP in order to send an image. Since my solution was to use localhost as the communication platform between the two programs, the files that you want to use will also be on the local harddrive.

If the program was meant to be used remotely it would make more sense. So now all the images are loaded from the harddrive and the files are not copied to the root folder as they were.

The Unity interface now runs at around 1-2% cpu which was where my target performance should be. It runs to around 20-25% if you want to render as many fps as you want. I’m leaving the option there for now. But later I will remove that part. Since the capture software only runs at 30fps anyway there’s no real point in running 1000 fps.

The project

I created a windows forms application. I did some modifications to it, so I have a gameloop instead of the event only based system that you normally get in windows forms. The good thing is that I can set my own update and draw loops if I so desire. That said, in this case it turns out that the control panel takes up way more CPU than intended, so that will have to change. Luckily the rest of the code is within a standard windows forms, so the code can be copied and pasted in and it should still work.

So far the control panel of the project looks like this:

overlayControlPanel

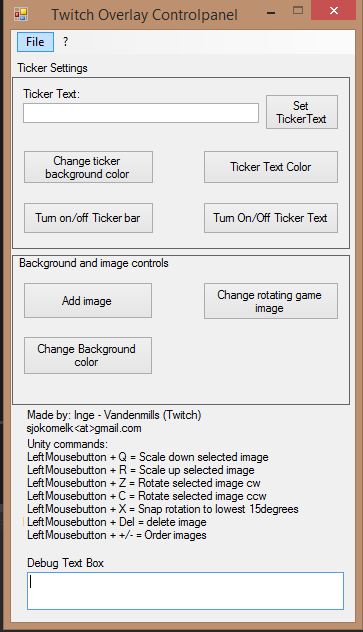
I will have to change that, so far it’s just basic controls. Each of the color buttons, opens up a color picker dialogue box. The Add or change buttons opens up a file dialog box. Rest is just to turn stuff on and off.

The Unity window looks like this:

unity image

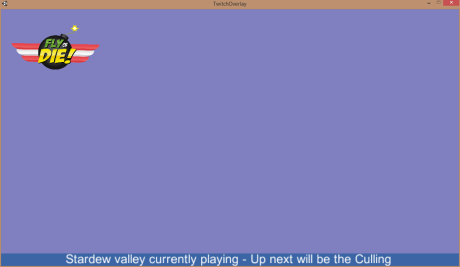
In this window you can rotate, move around different elements. Color changes and images are gotten from the control panel. The ticker on the bottom is a text that scrolls along the bottom. After a certain interval it restarts and displays the text again.

When exiting Unity, the text, text color, logo image, logo placement and scale, the background and background of the ticker, are all saved to a local xml file. So if you close the program down, you have the settings from last time.

I have also added a basic functionality for showing a webcam on the screen. But so far there is no chroma key for it, that is something I have to add, which shouldn’t be too hard to do. The sorting order is not yet saved and the same with adding new images to the scene. That is something I’m working on.

The saving method is using the IFormatter and XMLWriter to create an XML file. In the beginning I wanted to serialize using binary format. But then I figured that using XML let the user read the file and modify it. If they want to do that it’s fine by me.

Going forward

I consider the program to be more or less “done” now. It’s not finished, but what I set out do do and more I have accomplished with this. Normally I would start the other way, reaching out to people asking what they need and create a spec and create prototypes. That way people can point to features they would like and how they want to use the program. In this case however I just wanted to see how to communicate between programs. Using the Twitch overlay to do this was more or less just a way to test that out.

But now that I have a fully working system, I was thinking of maybe expanding upon this. Using overlay like NodeCG is a bit cumbersome, and even though every function needs to be programmed in, you can do a lot more faster and easier once the system is setup as it should.

All that remains now is really to save the other images and save their positions.

Lessons learned

Using the UDP packet to open up TCP is a fine solution. Not really the solution I needed, but I see how powerful that combination can be.

Creating a robust package type and handler that all are encoded in the same way making it easier to add functionality. I went from 4 different package types to 10 and implemented how it works in a matter of an hour or so. Where most of the time was spent to create the event for that package arriving and working around the problem of not running gameobject related code in a separate thread. The packages I created was really simple too. Just a header with the type of package arriving with the length of that package and everything that follows is the information. Whether it is text or numbers. As long as you decode the package on the other end in the same fashion it’s easy to handle the packages.

If you want to create a program for a specific need, research that need first then do the program. I fear that my lack of research will make the program either obsolete or usable but bad to use. I know that a lot of streamers use hotkeys a lot, and my program has none so far. Also I put the setting on the Unity window, for all I know maybe you rather want settings in the control panel so that you can load up settings for a certain game instead. Or maybe they want both.

I don’t know and until I can reach a streamer that is interested in something like this, it’s a guessing game. That being said, it’s very easy to change aspects of the program if I so desire.

Creating textures on the fly in Unity is very simple. All you need is to create a texture of a certain width and height. Then you fill an array with the same amount of colors that you have in the array and set that into the texture. Since I was using a sprite I used the Sprite.Create method and added in the texture, and a rectangle and the pivot point. For me the pivot was always new Vector2 (0.5f, 0.5f) to make the pivot  in the middle.

Another thing I learned is that the deserialize method doesn’t work as well as the serialize method does. I had to write my own XML parser for the file. But I had created an XML parser before so that was not so difficult.

That’s it for now. My next task ahead is to make sure that if you add images that they get added back in. Other than that I have no more plans for this program until I get any feedback. I might fiddle with the webcam and chroma key, just for the heck of it.

Last week I talked about named pipes. Named pipes seemed like a good idea on paper and I started this week with trying to find a way to get it to work. The problem was that named pipes works like a server. In order to connect it needs to be up all the time. I didn’t really want a system like that. I wanted the system to be independent, but if the client program was opened and gave new instructions the Unity part would do what you instructed it to. At first the thought was to start the “server” then start the client, but the problem was that the threads seemed to get stuck when quitting, I don’t know if it was because the connection thread was still open until the client program got closed or what it was. I tried troubleshooting it, but debugging is hard to do when running more than one thread.

In the middle of this week I decided to scrap the named pipe system. Reason for this was many, but mainly it was because it was very unstable. Even Unity Editor didn’t seem to like my approach. Sure that could be because I didn’t grasp how to use the named pipe, but it’s difficult to troubleshoot once you get to multiple threads and one thread which is invisible to the debugging system to figure out exactly where the problem lies.

UDP – Solution

Since I had a package system I figured I would reuse that, the choice was TCP or UDP. The advantage with TCP is that you can send files larger than ~60kb, which is something I needed, but at the same time I didn’t need TCP all the time. I decided to do a hybrid solution. Hybrid solution sounds dumb, but what I have done is to make most of the communication go through UDP. So when the user click on a change background button, the background colors are sent through an UDP package. Same thing with smaller packages. If the user on the other hand wants to send a file, what I do then is to send first a small UDP package. The package then instructs the server to open a TCP socket and the client  subsequently starts to connect to the “server” and transmits the data. Once the file is submitted the TCP listener stops listening and shuts that part down. The client does the same.

I said I should have something to share this week, and I sort of do, but since I needed to change stuff mid-week I have not been able to get that much further. Except there are no crashes. I can send files and I can read those files on the Unity end and display those files in the Unity window. I can also change the background to a different color.

Another great thing is that I can start the “server” or “client” independently and it still works. Since UDP doesn’t care if it gets delivered and there’s no real connection. The packages are just being sent and if the receiver is up it receives them. For me that makes it more user friendly and less error prone as well.

For security reasons I added a passphrase with the package that is being sent to Unity so that it only opens if two conditions are met. That the package type is correct and that a string in cleartext (which is not very secure).

Lessons learned

Well, there’s a couple of things I’ve learned. One is that even if Unity has a built-in networking system, you can still create your own UDP handler. Which is very nice, and basically I found out that with a preference change in Unity you have access to all of the .net 2.0. Just change the Api compatibility level from .net 2.0 Subset to .net 2.0 and you have access (Edit – Project Settings – Player). I had to do that for named pipes too, but I forgot to add that last week.

To be able to access GameObject.Find(), gameobject.GetComponent (or GetComponent for that matter) you need to run in the main thread. Which at first didn’t make sense, but once I started thinking about it, changing a component in a thread while the main thread is running update is not particularly wise. Workaround for that for me was to create events. The event was invoked, the setting I wanted change was set dirty and in the next update it was updated.

If you only want to send information and not want to create a connection, use UDP. Even internally it works fine. I don’t know how the speed is compared to named pipes. But from what I understood even named pipes is a network type of stream. Instead of an ip address, it uses an internal protocol. Besides the stuff I want to create is not really based upon speed, it’s more based upon getting the information.

What’s next?

Even though I have done all I set out to do on this project. I mean sending information I want to finish this project. Since next week is Easter I don’t know how much I can do until next week. But who knows.

I’m going to talk about something I have not yet completed, but I mentioned it in my previous blog. What I have been trying to accomplish is to have one Windows Form application to communicate with Unity . The idea is to use the windows form application to control Unity.

Reason for wanting to do that is several, but mostly it’s to see how it can be done. Now the original plan was to use network. I have successfully tested network communication through console and I know that works. I did not test that however with Unity, but Unity has its own networking pipeline and I did not want to mess with that. There are however ways to deal with it, but I figured that I would test something simpler.

The solution I’m currently testing is NamedPipe. I thought I would get away with not having to deal with creating a different thread for Unity, that turns out to be false. You need to have a thread running that monitors the incoming traffic.

Setup so far

I created a windows forms solution with 3 buttons, a color picker and a window. The window is just a multiline textbox which catches debug messages. But the 3 buttons for now are used to send 3 different messages to the Unity game.

Reason for choosing named pipe in the first place, was that it was a .net feature that I hoped would be easy to use. It is sort of easy to use, but one thing I forgot was that sending text to another program is easy. However distinguishing between different commands is  not that easy through text.

What I needed to do was to create a packet system. Yes, it sounds dumb, but since you are writing data in the form of bytes, you need to communicate through those bytes. Converting them from and to the data you need.

Packets

This is not set in stone yet, but so far the packet system I created was just an enumeration and a size of the buffer coming in. I set the buffer to be 512, but one of the things I didn’t know  was that the size of the buffer coming in, is the size of the buffer I set. Basically the byte array I get  is 512bytes long, even if I get 12 or 60 bytes of data. So in order to know how many bytes that I need to read I needed to get that information in the header.

The enumeration I wanted there because it is easier to remember that PacketType.MoveLeft is to move left than 0, 1, 2, 3 etc. This distinction makes it easier to also know how to decode the message that comes in.

I have yet to make a package handler, so I need to do that too, but current testing shows that it works to for instance change the background color from a color picker that Windows offers. Which is nice. I don’t know if that is something I will use. All of this is just because I wanted to see how to pass information from one program to another.

So far it works. Unity editor crashes left and right though, but that is I believe more related to the thread that I needed to create in order to constantly monitor the stream. The program that sends stuff is fairly solid, it does crash if it starts up before Unity, but that is a minor fix.

Tips for those who want to test it out

There are two ways to use named pipes. One is with streamwriter and streamreader, the other is doing it without. I had lots of crashes with Unity by testing out the streamwriter and reader. I decided to do it over, and now it works better. Some of the reason however is that I found out that if you BeginWrite, you need to EndWrite. Same with BeginRead, you need to EndRead too. So if you have something that begins, always remember to end it.

Another tip, if you are using threads and you separate them and make them run in a loop in the background, be sure to abort them at the end and also make sure the loop ends. I used that in the deconstructor. That did not work well, use the: OnApplicationQuit method instead. That way when you click the play button again to make it stop, the thread stops since the deconstructor doesn’t run in the editor. At least the loop never stopped unless I put stuff in the OnApplicationQuit method. Can’t explain why, did not research it. Tested it and it worked.

Patience. IT will crash. A lot. Unless you’ve tested it before and know exactly how it works before starting.

Anyway next time I hope to have more to share. I did not share any code, it contains a lot of debug messages, as threaded operations in Unity seems to be harder to debug, so instead there’s a million of Debug.Log messages.

Last tip: Make sure to disconnect the pipe before stopping Unity.

If you want to read more about this though here’s a couple of links that helped me:
https://msdn.microsoft.com/en-us/library/bb384066.aspx
https://msdn.microsoft.com/en-us/library/bb546085(v=vs.110).aspx