I’ve been blogging a lot on a different account on a different topic. I wanted to create a new blog, and I knew I had one from my student days, but I didn’t have the student email address anymore, so I sort of had given up on logging into  this. But now that issue has been resolved.

Since I’m currently employed, and a lot of the things we do at work is classified, except for the technology used, I’m not going to talk a lot about that. Instead I want to say more about private projects that I have going on.

Current stuff

I must admit I haven’t done much  in terms of programming outside of work. Work, kids and social life has taken most of the time away. But now and again, whenever I start doing stuff, I’ll post it here if I find it worth posting about.

Yesterday I did something that I have been wanting to do for a while. It’s not really a Matrix effect, but it’s sort of a Matrix like effect. I know that this is easy for people to do. It’s not really tricky, but I thought it was cool that I finally figured out at least one way of doing this.

Moving forward I want to test out if I can create a snake like dos game. It’s a long time away, but I think it would be cool to just test it out, just for the heck of it. In any case, what I did now was just a simple Matrixish thing.

Captured with gifcam (http://blog.bahraniapps.com/gifcam/ )

test4.gif

I know the matrix effect is more 1 and 1 character falling down the screen, but it’s not really about that. When I first was a student the teacher was making the same triangle shapes as the rest of the class. The difference was that they were updating with different random letters. So he found a way to modify the data written on the screen.

I forgot to ask how it was done, but I’ve been thinking of how. I mean all you really need to do is to figure out where in memory it is stored, then change the character. Right now however I haven’t done that and all I do is changing the location of the input and adding a new line on top and pushing the rest down and writing the line over.

The next version I want to get the pointer to the input in memory and changing it directly, if that is possible.

This was also just done to quickly “prototype it” so the code isn’t as much. I’ll post it, critique it if you wish. It looks horrible, but I need to have the paid version in order to install a plugin and I don’t want to do that.

The code

#include “pch.h”
#include <iostream>
#include <Windows.h>
#include <ProcessEnv.h>
#include <time.h>
#include <vector>
#include <string>

HANDLE hStdOut;
DWORD fdwSaveOldMode;

void ErrorExit(std::string lpszMessage)
{
fprintf(stderr, “%s\n”, lpszMessage);

// Restore input mode on exit.

SetConsoleMode(hStdOut, fdwSaveOldMode);

ExitProcess(0);
}
char getRandomCharacter(short min, short max) {
int randomAdd = rand() % (max – min);
char character = (min + randomAdd);
return character;
}

std::vector <char> createRandomCharactersOnConsoleLine(short lineLength) {
std::vector<char> line;
for (int i = 0; i < lineLength; i++) {
if (rand() % 100 > 50) {
line.push_back(‘ ‘);
}
else {
char randomChar = getRandomCharacter(35, 125);
line.push_back(randomChar);
}
}
return line;
}

int main()
{
srand(time(NULL));
hStdOut = GetStdHandle(STD_OUTPUT_HANDLE);
if (hStdOut == INVALID_HANDLE_VALUE) {
ErrorExit(“GetStdHandle”);
}

char min = 35;
short max = 125;
COORD largestXY = GetLargestConsoleWindowSize(hStdOut); // window size

// it was not accurate, had to reduce the X and Y.
largestXY.Y -= 33;
std::vector<std::vector<char>> characterMatrix;
SetConsoleTextAttribute(hStdOut, 0x0A); // color

short yCoord = 0;
short x = floor(largestXY.X / 2);
COORD placement;
placement.X = 0;
placement.Y = 0;
for (int i = 0; i < largestXY.Y; i++) {
std::vector<char> charLine;
for (int j = 0; j < largestXY.X; j++) {

charLine.push_back(0);

}
characterMatrix.push_back(charLine);
}

while (true) {
std::vector<char> line = createRandomCharactersOnConsoleLine(floor(largestXY.X/2));

placement.X = 0;
placement.Y = 0;
SetConsoleCursorPosition(hStdOut, placement);
for (unsigned int i = characterMatrix.size() -1; i > 0; i–) {
if (i – 1 > 0) {
characterMatrix[i] = characterMatrix[i – 1];
}
else {
characterMatrix[i] = line;
}
}

for (unsigned int i = 0; i < characterMatrix.size(); i++) {
for (unsigned int j = 0; j < characterMatrix[i].size(); j++) {
std::cout << characterMatrix[i][j];
}
}
}

return 0;

}

The last couple of weeks have been slow when it comes to development. There’s a lot of reasons for that, but mainly because there’s been a lot of personal stuff going on. Meetings and stuff like that.

Also it’s been a couple of weeks where MVVM has shown itself from its “worst” side. The reason why I say “worst” side is that a lot of the things I want to accomplish is not as easy as the boilerplate approach. But since I want to learn, doing things the usual way is easy, doing it a different way is often more enlightening.

One example of that  is that I wanted to change the background color of the application during run-time. To illustrate this, the normal UI looks like this:

normal_WPF_UI

Since I want to have a different look on the background to illustrate further that it is disabled while another window is on top. I wanted to change the background color. To accomplish this, I needed to do more than just have a System.Media.Color type as a property. I used:

<Window.Background>
<SolidColorBrush Color=”{Binding MainWindowVM.CurrentWindowColor, UpdateSourceTrigger=PropertyChanged}”></SolidColorBrush>
</Window.Background>

Instead of using the Background=”{Binding MainWindowVM.CurrentWindowColor}”. The  reason why this is done I’m not sure of yet,  but from my understanding, a SolidColorBrush is the type that is needed. Since the property returned is a Color type the types seemed to be mismatched somehow. It would probably be easier to use SolidColorBrush as a property type instead of System.Media.Color. At the time however I did not know it was a Class I could use, but I have since learned that Most of the XAML “codes” are classes that you can use.

Anyway, what I wanted to do was to accomplish this:

normal_WPF_UI_windowOpen

This will hopefully make it easier for the user to see what is the active parts of the program. The header is still in the normal color, at first it was not intentional, but since you can still move the  window around I found  out that it was better that it was like that. This way the user knows that it is not disabled, like the rest of the controls are.

The same happens when other popup windows are open. It’s a small step on a road that has been much longer than anticipated.

Further progress

In the next phase, depending on what the future brings, I hope to get the new UI setup as I want it to be. It goes a lot faster to accomplish the tasks, but there are some tasks that take longer than anticipated, because there are unforseen problems that occur. One of those has been the tray combobox that is a bit unpredictable. It doesn’t update as I hoped it would. For instance if an element is updated, the combobox is not updated to reflect that change.

But for the most part, once I figure out the combobox and how it updates, it should be fairly easy. The wise choice would be to move on to other tasks, but that  would mean this issue would be dangling over me. There is a workaround however, I could use a selectedIndex and get the ID number from that and get access to the ObservableCollection from that, but it’s not as elegant.

But hopefully by the next update I will have solved the issue and moved on. But it depends on the future, since I’m awaiting to hear from a company that might want to hire me to create software for them.

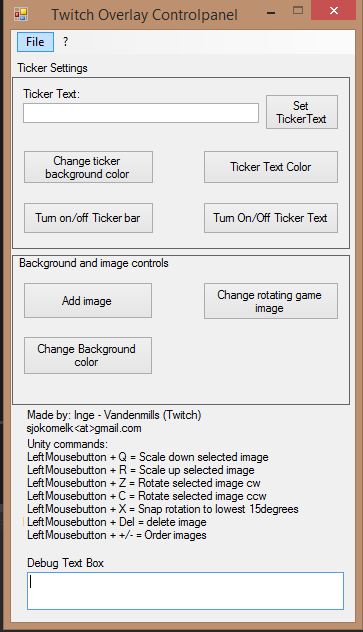
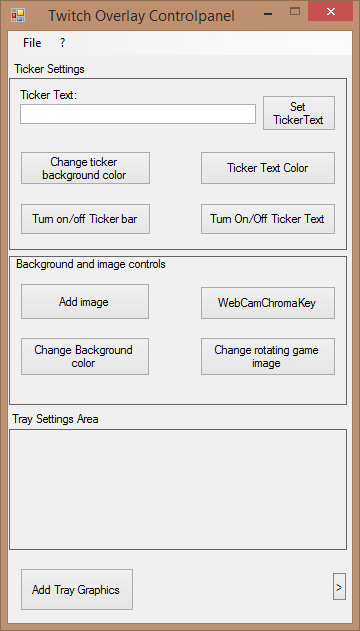
It’s been a busy time for me. Mostly because I’m trying to learn new stuff, but also because I want to learn the new stuff in a right manner. In my previous post I started using WPF – Windows Presentation Foundation on a new interface. I used the designer and just created the GUI, and did not write a single line of code. I created the GUI based upon how I would do it in a Windows forms application.

Later on I started looking at how you do certain things in WPF, because the end goal was to actually learn something. Not do what I think is right and end up with spaghetti programming. After reading up on how to utilize WPF best I found that there’s a design pattern that is called MVVM. I have already encountered the MVC pattern and used the idea of it in a Unity application. Now before you faint, MVC in Unity was not the MVC as you find in web applications. It was called AMVCC, Application Model View Control Component. But the idea was mostly the same to  separate the model from the view and have the controller do the work. The exception was that everything was run from the Application class, where everything resided (In a game object) and the hierchy inside Unity was Model, View, Control.

Confusious Confused Confusiado

Basically when starting out, what didn’t make sense to me was the word model (I was working in Unity at the time), was that model was the 3D models for me. However I have since learned that Model is the Data Model. Just thinking Data Model when thinking of Model made it so much clearer. View is simply the GUI, the GUI gets the data from the model. The control is the machine that works on the model and the model data is changed and reflected in the GUI. When I worked in Unity with AMVCC we used events to update data that the view then read and the data changed based on what the controller said the data was.

Therefore going to MVVM caused me a lot of head ache in WPF. I read pages upon pages about MVVM but it didn’t get any clearer. I contacted someone I know who just weeks before talked about MVVM and asked him and he said that he didn’t like it very much because it was a weird way of designing the app.

At this point I had a choice, I could make the app, the same way as I did with the windows forms version, ie in every button I would make a code snippet and open a form, pass the data I wanted back into the form and then make a very messy program. For a change I didn’t want to do what was easy, so I ended up taking an online course. I started looking at MVVM and found out that I need more knowledge. Not about MVVM firstly, but about how the WPF framework actually worked.

Back to the drawing board

I decided to take a step back and look at what makes WPF what it is. The answer is the underlying XAML. At first I thought I wouldn’t need to know anything about XAML to be able to make a WPF application. Turns out, that’s wrong.

I started with taking an online course in XAML, understanding what XAML is, what happens with it. Why  you need x:Name on certain controls and why other controls used x:Key. Understanding how you nest the XAML statements and how binding works. Unfortunately I cannot teach the principles as well as the Pluralsight video did (they had two very brilliant videos on XAML and MVVM).

Anyway, what I didn’t understand (before I took the course) was that x:Name is how you can refer to the control. Let’s say you have a label, you want to access that, you can’t unless you give that label a name. Giving it a name let you access that control and change it’s content, color and whatnot. But doing that in code behind is sort of going against the whole MVVM pattern. But this is where it all fell into place. The XAML is the way you design the window, in the MVVM pattern you set up data binding to the ViewModel. The ViewModel is the mediator between the View and the Model.

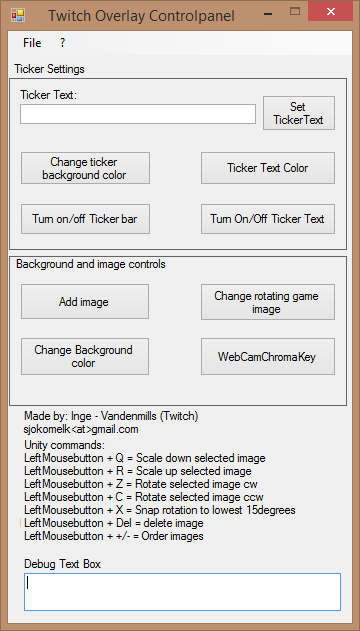
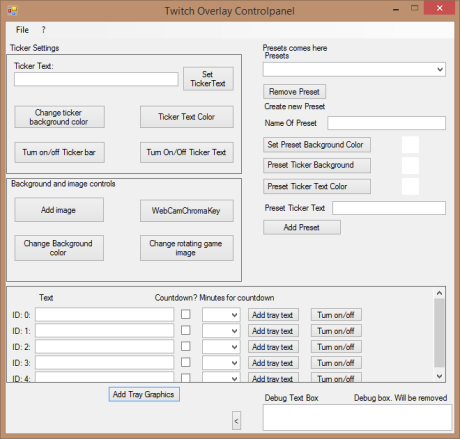
It doesn’t stop there either, because Views can be both the GUI, but also a page. Pages are small GUI “snippets” that isn’t the complete view, but part of the GUI. As an example, I needed a color picker. But it doesn’t exist, so I downloaded the extended WPF toolkit, which contains the color picker as I wanted it, but it also contained a Color Canvas. In order to get the choice I wanted together I built a page where the page contained all of the things I was interested in. The page however is not a complete view, but rather something that pops up over the main window. But it is still a view.

The above is an example of a customized colorpicker. Basically the page pops up in a frame over the main window instead as a separate window. But in fact it is a separate window, which moves with the window attached inside.

MVVM – Commands – Databinding

XAML is a designer “language”. In Visual Studio there are tools to build the GUI. And the whole point with MVVM is to create a workflow where the GUI designer, design the GUI, using Visual Studio or Blend. The programmer then bind the different buttons to commands.

Turns out I needed to use another pattern called the Command Pattern. Command pattern is a simple pattern that basically issues commands and have a check to see if you can execute that command. In C# you have the Action and Predicate classes to use for that. Basically you inherit the ICommand interface and you have two methods. The Execute method and the CanExecute method.

Why is that important you may ask? The reason why this is important is that you use Commands on the buttons to perform the tasks you want. Here’s one example, this is how the color picker from above is displayed:

In XAML:

<Frame Source=”View/ColorSelectionView.xaml” Margin=”0,0,0,235″ NavigationUIVisibility=”Hidden” Visibility=”{Binding DisplayColorPicker, UpdateSourceTrigger=PropertyChanged}” Height=”424″ VerticalAlignment=”Center” Width=”259″ HorizontalContentAlignment=”Center” />

That means  that the visibility is false at the start, because I set the ColorSelectionView Visibility to Visibility.Hidden. This is also important, it’s not a boolean, it is a Visibility.Hidden, Visibility.Visible and Visibility.Collapsed

To hide page again from the main view again XAML code:

<Grid HorizontalAlignment=”Right” VerticalAlignment=”Top”>
<i:Interaction.Triggers>
<i:EventTrigger EventName=”MouseDown”>
<i:InvokeCommandAction Command=”{Binding MainWindowVM.CloseColorDialog, UpdateSourceTrigger=PropertyChanged}”/>
</i:EventTrigger>
</i:Interaction.Triggers>
<Ellipse HorizontalAlignment=”Center” Height=”30″ Stroke=”#FF201A38″ VerticalAlignment=”Center” Width=”30″ Style=”{StaticResource CloseButtonElipseStyle}”/>
<TextBlock Foreground=”White” Text=”X” VerticalAlignment=”Center” HorizontalAlignment=”Center” FontSize=”20″/>

In the XAML code above, the visibility is bound to DisplayColorPicker through {Binding DisplayColorPicker}. DisplayColorPicker is a property in the ViewModel. I have made the mistake of having that in the MainViewModel, but the reason was that when I first started I wanted MainViewModel to invoke a completely new window. But I figued that why do that when you can display it over and disable the controls on the form.

Anyway apart from the mistake what you need is the following code:

private RelayCommand _openColorPicker;
private Visibility _colorPickerVisibility = Visibility.Hidden;
private bool _mainViewVisible = true; // Disble the buttons on the form
_openColorPicker = new RelayCommand(OpenColorPickerWindow, CanOpenColorWindow); // CanOpen can be null instead, chose to create the method because I wasn’t sure if I needed a CanOpenColorWindow.

private bool CanCloseColorPickerWindow(object obj)
{
return true;
}

private void CloseColorPickerWindow(object obj)
{
if (DisplayColorPicker == Visibility.Hidden)
{
DisplayColorPicker = Visibility.Visible;
DisplayMainViewContents = true;
}
else
{
DisplayColorPicker = Visibility.Visible;
DisplayMainViewContents = false;
}
}

public bool DisplayMainViewContents
{
get { return _mainViewVisible;}
set
{
_mainViewVisible = value;
OnPropertyChanged(“DisplayMainViewContents”);
}
}

public Visibility DisplayColorPicker
{
get
{
return _colorPickerVisibility;
}
set
{
if (_colorPickerVisibility == Visibility.Hidden)
{
_colorPickerVisibility = Visibility.Visible;
}
else
{
_colorPickerVisibility = Visibility.Hidden;
}
//OnPropertyChanged(“DisplayMainViewContents”);
OnPropertyChanged(“DisplayColorPicker”);
if (_colorPickerVisibility == Visibility.Visible)
{
_mainViewVisible = false;
}
else
{
_mainViewVisible = true;
}
OnPropertyChanged(“DisplayMainViewContents”);
}
}

public ICommand OpenColorDialog
{
get
{
if (_openColorPicker == null)
{
_openColorPicker = new RelayCommand(param=>this.OnOpenColorDialog());
}
return _openColorPicker;
}
}

public event EventHandler OpenColorDialogHandler;

void OnOpenColorDialog()
{
EventHandler handler = this.OpenColorDialogHandler;
if (handler != null)
{
handler(this, EventArgs.Empty);
}
}

In other words, a bucketload of code just to accomplish a small task. But the advantage is that once you know that you need to do all that, you can streamline the process. In my case, even thought the  project is small, I was thinking of doing partial classes. Because as I have noticed thus far with C# is that the code gets large and it gets large fast, so the solution would be partial classes and then divide it up into fitting blocks. Like: MainWindowViewModel.ColorPicker ,
MainWindowViewModel.Ticker,
MainWindowViewModel.Image
etc.

I haven’t decided yet, but those parts are not related to each other, and since they aren’t the variables and methods can be on their own. Also I have in the past created a single method for Eventhandler like this:

private static void Handler(NoArgDelegate handler)
{
// ReSharper disable once UseNullPropagation – Doesn’t work in .net 2.0
if (handler != null) handler();
}

private static void Handler(SingleArgDelegate handler, object arg)
{
//Debug.Log(“Handled the event”);
if (handler != null && arg != null) handler(arg);
}

private static void Handler(DualArgDelegate handler, object arg1, object arg2)
{
if (handler != null && arg1 != null && arg2 != null) handler(arg1, arg2);
}

Then the handlers are used like this:

public static void FadeOutInterfaceTrigger()
{
Handler(OnFadeOutInterface);
}

public static void ReceivedGameImagePreset(object arg)
{
Handler(OnSetPresetGameImages, arg);
}

public static void ReceivedSpeedAndDuration(object arg1, object arg2)
{
Handler(OnReceiveSpeedAndDuration, arg1, arg2);
}

The drawback is that it can be error prone as you need to know the values coming in and cast them to their right type when getting the parameters.

Anyway that was a digression, moving back on track to the MVVM. The MVVM is a fairly complex pattern at first and it seems intimidating. The good news is that as long as you aren’t meddling with the code behind, there are some  acceptable code you can use as code behind on the different views and that is code that is specific for that window. Close button behavior and what you click on to move the window (for instance). You can choose to do that with MVVM, but it is far easier to just add the proper events and do it that way.

What I didn’t get to above when it comes to Commands is that since events is done in the code behind, commands are what you use instead of events. Data binding you do to reflect data changing in the model or the view.

I’m going to end this with a Calvin and Hobbes strip. Because this is how it feels like working with MVVM at times. It’s when you question, what and why am I doing this and the obvious answer is right in front of you, because it’s a very good practice to do so, even if the code base gets much larger and more complex.

Evua7eL.0

A little more than a week has gone by and more programming has been done. This time I was requested to put sound into Unity. Sound in Unity is normally not a problem. It’s just a matter of saying “Hey Unity, I have this AudioClip, drag it onto the AudioSource and you’re done.

What I didn’t account for was when the user wants to load a custom clip, that you need to load it into memory first. All of a sudden it’s not as easy as with images. There are loads of codecs and some support streaming, others do not.

Loading sounds during run-time

The solution to loading sounds during run-time was to use the WWW class that exists in Unity. Basically what you do is use:
WWW www = new WWW(“file://pathAndFilename”);
AudioClip clip = http://www.GetAudioClip(false, false);  // Worth noting, last false is if you want it streamable or not.
Then the solution that worked best for me was to use Getcomponent<AudioSource>().PlayOneShot(clip);

Since this was part of the animation that I did I just expanded the class and it seemed to work. I did get some complaints, so I need to look into why that is and how I can fix it. Locally however it works flawlessly. This however only worked for .ogg files. Loading .wav I have not tested.

WPF – Windows Presentation Foundation

The second thing I wanted to discuss, and this is actually the biggest topic is the WPF. At first it was a true pain in the ass to say it bluntly. Considering however that I started today to see how it works, I’m happy with the progress. I was able to draw the application and get it to look how I wanted it to look.

Here’s a screenshot of the Stream Overlay I have recreated today:

screenshotNewUI

So far I have only created the graphics layout with some help of a friend (Henrik) who gave me tips on what colors that matched each other. Of course the UI needs to be streamlined a little bit. I have some spacing here and there I need to fix, but that is a small issue.

Working with WPF

As I said in the beginning, working with WPF was a not particularly fun. I did get that most of it is about working with XML in the editor. What I have learned however is to use styles that you can modify the way you want. Combo boxes for instance was not easy to get to look like the rest of them. But luckily there’s a way to get a whole bunch of XML generated for you. Once you figure out how the different functionalities work it’s not too hard. Besides the editor in Visual Studio 2015 works well. There were a couple of instances where I was sure that I had messed up when editing the XML. But luckily you can see what line is causing the problem and try to figure out the problem from there.

In my opinion it’s not as easy as working with the old Windows Forms, but it looks SO much better. It looks sleek and more inviting. I will try to continue develop both in tandem, but my main focus will most likely be to use the new WPF. Also I have to say as usual, Google is vital in finding errors and problems that might occur. Even if the error or problem isn’t the same you get a hint how to make it work.

One example of this was when I started out, I managed to delete the <Grid></Grid> tags and I couldn’t get any of the Windows controls to work. But after checking the error, I found a place that described that problem in a different context and I was able to see that <Grid> tags were missing for me.

From what I gather as well, the way WPF works is the same as Android works, it’s slightly different, but it’s very similar. So that bodes well when I want to look at developing an android interface for this at some point. I have looked at it before, just never got around to really look at the Android GUI.

Last but not least

Lastly though it is worth noting that what I have is just the GUI. It’s not working. The only two things that actually work at this point is to drag the window around and closing it by clicking the cross on the top right corner. So I expect that it isn’t as easy to just copy code over from the other project, but time will tell.

Next time I will hopefully still have my hair intact and that the code I have created for the Windows Forms project is more or less portable as is. If not see you hairless and frustrated next time.

I didn’t know that it has been this long since I last blogged anything, but I’ve been busy with the program I’m working on. There’s been some progress, but also some setbacks. Mostly the setbacks have been caused by unexpected behaviors and poor planning. Yes, poor planning, but in all honesty most of this program started with just a test and then evolved into a test. Then I showed that test to someone and I got inspired to continue working on it. Which means that before I started I didn’t really plan on the amount of features that the program currently has. The program parts currently looks like the images below.

UnityOverlay

Overlay

UnityControlPanel

Control Panel (Yes, I am aware of the misalignment between the buttons)

Setbacks

Since I haven’t had much time to plan anything, some of the programming I did in the early stages was done just to get things to work. One example of  this was before I discovered serializing. Serializing in C# is very easy, in fact it’s so easy to do that when creating files in the future, that’s the method I prefer to do. There’s in principle 3 steps, here’s one snippet from code I am currently using:

XmlSerializer formatter = new XmlSerializer(typeof(List<Preset>));
Stream stream = new FileStream(settingFilename, FileMode.Create, FileAccess.Write, FileShare.None);
formatter.Serialize(stream, listOfPresets);

But before I discovered that simple way of writing to file and reading from file, I used a far more complex way, this is an example of that using an XML reader and reading each tag:

string xmlContent = File.ReadAllText(“.\\settings.xml”);
XElement xmlElements = XElement.Parse(xmlContent);
List<XElement> xmlElementList = xmlElements.Elements().ToList();
for (int i = 0; i < xmlElementList.Count; i++)
{
List<XElement> subElements = xmlElementList[i].Elements().ToList();
if (xmlElementList[i].Name == “WindowBGColor”)
(……) And additional 50 lines of code

Quite a difference in code and how easy it is to maintain. If the class changes all I need is the [Serializable] on the classes I add and the code doesn’t have to change at all. The setback was that I needed to rewrite the code, although in the end it was less code than I started with. But that means it is easier to maintain.

The other setback I had was that when I first started I had everything in so called packages. The thought behind it was that in the beginning i wanted to create packages sent through a named pipe. The named pipe required to know the length of the data and a buffer. I created a system where I send a type of package, length and data. But I have since changed from named pipe to UDP, but the packages still worked as I wanted them to work. So I kept the name. But I was locked into packages and thus created all kinds of package this, package that, because I wanted to have the same type on receiving and sending side. This package thought crept into other parts of the program and before I knew it I had Tray, TrayPackage and TrayData. Preset, PresetData, PresetPackage. And so on and so forth.

Some of the reasoning, if you can call it that, was  that I needed to have the same datatype on the Control Panel as in the Overlay part. I have since moved away, I needed to rewrite a whole lot of code. I unified all classes having more than 1 of a similar type into one of each. So instead of Tray, Traydata and TrayPackage, I now have Tray. Instead of Preset, PresetData, PresetPackage I only have Preset. There are a few other examples, not as bad, but some had two of the same type. All of that costs time to redo and make sure that what worked before still works after changing it.

But it doesn’t stop there. Another setback was that I didn’t know I could use serialization to send data more reliably as well. Honestly I didn’t know of serialization when I started sending the “big” classes through UDP either. So I constructed a key system. The sender would construct the class into one single string. The keys were used to know where the string started and where it stopped. That way I could extract the part I needed.

The problem was that once I needed to change the class, I needed to  construct a new key. I had however created a system making it easy to extract the key, so adding keys was not really a problem, but each key made the code less readable and I needed to add it on  both sending and receiving end without any spelling errors.

Since both end didn’t have the same class, I created a way to serialized the individual parts that were the same and create a byte buffer from that and send that through to unity and decode that with a deserialize on the other end. That worked much better. The code, not so much smaller, a tiny bit, but not as much as I had hoped. Since the serialization method that is built in only works for basic types I had to break the class up in those parts, but that said, the serialization/deserialization method works well on both sides.

Progress

Despite all the setbacks and rewrite of code, which I nearly expected to do, I have made great strides. For instance now scenes are saved upon exit, but not just the images you add, but the trays as well. Rotation, scale, position are all saved. If you have a tray you wanted automated, it still is automated. Presets also clear the scene and add all the objects. If the preset has been used once before it checks the position, scale and rotation of the objects and sets them to the saved position. These positions are saved automatically.

I have also added two default presets that are a bit special. The reset scene preset that resets the scene to a default color and a default scene, which is more or less a playground to test the different functions out. It is possible to use it as a preset and it is the preset that is loaded by default.

The second part is an animator. This took far more work than I intended, at first I figured it would just be a rotating image that scaled in, then stayed on screen and then faded out while rotating out. By the time I figured I would need fade in, fade out, rotate in and rotate out timers, I figured, why not let the users set all the settings themselves? Which is what I did. Users can now decide if they want to rotate an image in, how big the image should be at the end, how fast the animation should go. At what point in time the animation should start to fade in, fade out, rotate in, rotate out, scale up and scale down. That does mean the users can mess it up, but if it doesn’t work, it shouldn’t be a problem. The animation system also works independently from presets.

Summary

Despite all the setbacks, I feel like the progression has gone forward. Now I need to take a step back. Create a plan for what I want to do forward. There are 2 features I want to implement, both I have experimented with and have managed to get working. The first feature is the miniature ticker. The miniature ticker will be used to show for instance who has donated last, latest followers and latest subscriber, to mention just a few examples. Right now the problem is that I need to figure out how to measure the length of a textmesh and there’s not too much documentation on how to do just that. Once I figure out that I can get the text to wrap around so to speak.

The second thing I want to accomplish is to do one of two. Either that the control panel sets the twitch information to Unity and that checks in certain intervals if the most recent subscriber / follower and handles that automatically. That sounds like the best solution on paper, however if twitch goes down Unity might start lagging and using a lot of cpu to try to connect. Second option is to use the control panel for that, but that means the control panel needs to be up at all times. Third option, which is probably what I am going for is to create a separate thread that sleeps for half a second and then checks. Then once there’s something new it updates the information. If that thread suddenly takes a while longer the program might take up more cpu, but at least it won’t crash or occupy the rest of the program.

If I do it on the control panel side, it wouldn’t be that problematic if something went wrong, but that also means the user need the control panel up at all times. Which is something I didn’t intend on. If the user wanted to they should be able to close the control panel. But in order to get the twitch connection to work, if i go with the control panel route, it has to stay open. First and foremost however I need to get more people to try it. Get their feedback and see what they need.

After my previous post, I decided to continue with the Twitch Overlay. I recently got done with a version I call 0.3a. The feature list isn’t that big, but I was able to reach a streamer and get some feedback on the program. That said if anyone reading this are streaming and want to test it out, let me know. I would love to hear from you.

One of the features requested was a tray that comes in and out of the screen. The control panel itself, the user was satisfied with, but after some testing, I found that I wanted to redesign the Control panel as well. More to get all the controls into one area, so that it is easier to keep the panel open.

Twich Controlpanel Evolution

Last week the control panel looked like this:overlayControlPanel

It also contains a lot of clutter and information. But basically I have kept that layout throughout the development process. There is too much text, but it’s difficult to tell the user what the different things are without some information. At a later point, I will refine this and give it shorter names. This is what I consider more fine tuning however, right now functionality far outweighs the text and what not.

0.1apanel

This was the next version. Basically the same, but I played around with the webcam. Actually got that to work and got a basic chroma key to work. It’s not flawless, but for Red, Green and Blue it works fairly well. That said, I will remove that feature as OBS has a better version. Only feature my webcam code has is that you can rotate it to the degrees you want to. In both 0.1a and the first “draft” the tray functionality was missing.

The next version was 0.2a: 0.2a

Here I have started to clutter down the GUI again. This was not from feedback, but I wanted to add some functionalities to the requested feature. The trays can  have text on it. The check box is if the user wanted to use a countdown timer and the dropdown box was to see how many minutes the user wanted to have the countdown clock to show. Then the add button was to send the information to the Unity window. The turn on/off button was simply to animate the tray on and off manually.

I needed to fix some of the labels that were a bit weird, so I added some better and more text to the panel. Making version 0.21a look like this:

0.21a

This is where I started to look at the user interface and see that I needed to fix this somehow. Firstly I didn’t want the interface to be this big. I only wanted to have controls so the user did not have to add stuff from that panel. So I decided to go back to the drawing board.

I removed all of the presets, I shrunk the tray settings area down. Instead I created a separate form that contains all the information I wanted to have there. Making the GUI look more like it looked like before:
0.3a

Now when the user click the “Add Tray Graphics” button, they get a box up where they can enter all the settings and then the controls for the tray comes up instead. Since the tray options have more space I could add more options, so the user can now for the most part only select where they want the image to stop and the rest is automatically set up for the user. They can still use keyboard controls within the Unity window to change direction and location of text and counters. Zoom in and out graphic and text if they so desire.

The interface is still not perfect. As mentioned above, I want to streamline the interface a bit more. Since I have ticker settings as a header, I think I should remove so that it says Text Color, Background Color, Turn On/Off Text and Turn On/Off background.

But this is minor stuff at the moment, I am currently more focused on getting the features in and later I can modify and make the interface better based on feedback.

Next week I want to get the presets to work, so that the user can send the preset to Unity. Then save the preset information in Unity, so next time the preset  is sent it checks for two things. First if the preset exists the preset is loaded from Unity preset list. Image locations are restored and all settings are set the way the user wanted it to be.  Unless the user selects to delete existing preset if it already exists.

Last week I talked about how I used UDP to open up a TCP socket to send a file to the client. This week I did some more testing and it turns out that I don’t need to open up TCP in order to send an image. Since my solution was to use localhost as the communication platform between the two programs, the files that you want to use will also be on the local harddrive.

If the program was meant to be used remotely it would make more sense. So now all the images are loaded from the harddrive and the files are not copied to the root folder as they were.

The Unity interface now runs at around 1-2% cpu which was where my target performance should be. It runs to around 20-25% if you want to render as many fps as you want. I’m leaving the option there for now. But later I will remove that part. Since the capture software only runs at 30fps anyway there’s no real point in running 1000 fps.

The project

I created a windows forms application. I did some modifications to it, so I have a gameloop instead of the event only based system that you normally get in windows forms. The good thing is that I can set my own update and draw loops if I so desire. That said, in this case it turns out that the control panel takes up way more CPU than intended, so that will have to change. Luckily the rest of the code is within a standard windows forms, so the code can be copied and pasted in and it should still work.

So far the control panel of the project looks like this:

overlayControlPanel

I will have to change that, so far it’s just basic controls. Each of the color buttons, opens up a color picker dialogue box. The Add or change buttons opens up a file dialog box. Rest is just to turn stuff on and off.

The Unity window looks like this:

unity image

In this window you can rotate, move around different elements. Color changes and images are gotten from the control panel. The ticker on the bottom is a text that scrolls along the bottom. After a certain interval it restarts and displays the text again.

When exiting Unity, the text, text color, logo image, logo placement and scale, the background and background of the ticker, are all saved to a local xml file. So if you close the program down, you have the settings from last time.

I have also added a basic functionality for showing a webcam on the screen. But so far there is no chroma key for it, that is something I have to add, which shouldn’t be too hard to do. The sorting order is not yet saved and the same with adding new images to the scene. That is something I’m working on.

The saving method is using the IFormatter and XMLWriter to create an XML file. In the beginning I wanted to serialize using binary format. But then I figured that using XML let the user read the file and modify it. If they want to do that it’s fine by me.

Going forward

I consider the program to be more or less “done” now. It’s not finished, but what I set out do do and more I have accomplished with this. Normally I would start the other way, reaching out to people asking what they need and create a spec and create prototypes. That way people can point to features they would like and how they want to use the program. In this case however I just wanted to see how to communicate between programs. Using the Twitch overlay to do this was more or less just a way to test that out.

But now that I have a fully working system, I was thinking of maybe expanding upon this. Using overlay like NodeCG is a bit cumbersome, and even though every function needs to be programmed in, you can do a lot more faster and easier once the system is setup as it should.

All that remains now is really to save the other images and save their positions.

Lessons learned

Using the UDP packet to open up TCP is a fine solution. Not really the solution I needed, but I see how powerful that combination can be.

Creating a robust package type and handler that all are encoded in the same way making it easier to add functionality. I went from 4 different package types to 10 and implemented how it works in a matter of an hour or so. Where most of the time was spent to create the event for that package arriving and working around the problem of not running gameobject related code in a separate thread. The packages I created was really simple too. Just a header with the type of package arriving with the length of that package and everything that follows is the information. Whether it is text or numbers. As long as you decode the package on the other end in the same fashion it’s easy to handle the packages.

If you want to create a program for a specific need, research that need first then do the program. I fear that my lack of research will make the program either obsolete or usable but bad to use. I know that a lot of streamers use hotkeys a lot, and my program has none so far. Also I put the setting on the Unity window, for all I know maybe you rather want settings in the control panel so that you can load up settings for a certain game instead. Or maybe they want both.

I don’t know and until I can reach a streamer that is interested in something like this, it’s a guessing game. That being said, it’s very easy to change aspects of the program if I so desire.

Creating textures on the fly in Unity is very simple. All you need is to create a texture of a certain width and height. Then you fill an array with the same amount of colors that you have in the array and set that into the texture. Since I was using a sprite I used the Sprite.Create method and added in the texture, and a rectangle and the pivot point. For me the pivot was always new Vector2 (0.5f, 0.5f) to make the pivot  in the middle.

Another thing I learned is that the deserialize method doesn’t work as well as the serialize method does. I had to write my own XML parser for the file. But I had created an XML parser before so that was not so difficult.

That’s it for now. My next task ahead is to make sure that if you add images that they get added back in. Other than that I have no more plans for this program until I get any feedback. I might fiddle with the webcam and chroma key, just for the heck of it.

Last week I talked about named pipes. Named pipes seemed like a good idea on paper and I started this week with trying to find a way to get it to work. The problem was that named pipes works like a server. In order to connect it needs to be up all the time. I didn’t really want a system like that. I wanted the system to be independent, but if the client program was opened and gave new instructions the Unity part would do what you instructed it to. At first the thought was to start the “server” then start the client, but the problem was that the threads seemed to get stuck when quitting, I don’t know if it was because the connection thread was still open until the client program got closed or what it was. I tried troubleshooting it, but debugging is hard to do when running more than one thread.

In the middle of this week I decided to scrap the named pipe system. Reason for this was many, but mainly it was because it was very unstable. Even Unity Editor didn’t seem to like my approach. Sure that could be because I didn’t grasp how to use the named pipe, but it’s difficult to troubleshoot once you get to multiple threads and one thread which is invisible to the debugging system to figure out exactly where the problem lies.

UDP – Solution

Since I had a package system I figured I would reuse that, the choice was TCP or UDP. The advantage with TCP is that you can send files larger than ~60kb, which is something I needed, but at the same time I didn’t need TCP all the time. I decided to do a hybrid solution. Hybrid solution sounds dumb, but what I have done is to make most of the communication go through UDP. So when the user click on a change background button, the background colors are sent through an UDP package. Same thing with smaller packages. If the user on the other hand wants to send a file, what I do then is to send first a small UDP package. The package then instructs the server to open a TCP socket and the client  subsequently starts to connect to the “server” and transmits the data. Once the file is submitted the TCP listener stops listening and shuts that part down. The client does the same.

I said I should have something to share this week, and I sort of do, but since I needed to change stuff mid-week I have not been able to get that much further. Except there are no crashes. I can send files and I can read those files on the Unity end and display those files in the Unity window. I can also change the background to a different color.

Another great thing is that I can start the “server” or “client” independently and it still works. Since UDP doesn’t care if it gets delivered and there’s no real connection. The packages are just being sent and if the receiver is up it receives them. For me that makes it more user friendly and less error prone as well.

For security reasons I added a passphrase with the package that is being sent to Unity so that it only opens if two conditions are met. That the package type is correct and that a string in cleartext (which is not very secure).

Lessons learned

Well, there’s a couple of things I’ve learned. One is that even if Unity has a built-in networking system, you can still create your own UDP handler. Which is very nice, and basically I found out that with a preference change in Unity you have access to all of the .net 2.0. Just change the Api compatibility level from .net 2.0 Subset to .net 2.0 and you have access (Edit – Project Settings – Player). I had to do that for named pipes too, but I forgot to add that last week.

To be able to access GameObject.Find(), gameobject.GetComponent (or GetComponent for that matter) you need to run in the main thread. Which at first didn’t make sense, but once I started thinking about it, changing a component in a thread while the main thread is running update is not particularly wise. Workaround for that for me was to create events. The event was invoked, the setting I wanted change was set dirty and in the next update it was updated.

If you only want to send information and not want to create a connection, use UDP. Even internally it works fine. I don’t know how the speed is compared to named pipes. But from what I understood even named pipes is a network type of stream. Instead of an ip address, it uses an internal protocol. Besides the stuff I want to create is not really based upon speed, it’s more based upon getting the information.

What’s next?

Even though I have done all I set out to do on this project. I mean sending information I want to finish this project. Since next week is Easter I don’t know how much I can do until next week. But who knows.

I’m going to talk about something I have not yet completed, but I mentioned it in my previous blog. What I have been trying to accomplish is to have one Windows Form application to communicate with Unity . The idea is to use the windows form application to control Unity.

Reason for wanting to do that is several, but mostly it’s to see how it can be done. Now the original plan was to use network. I have successfully tested network communication through console and I know that works. I did not test that however with Unity, but Unity has its own networking pipeline and I did not want to mess with that. There are however ways to deal with it, but I figured that I would test something simpler.

The solution I’m currently testing is NamedPipe. I thought I would get away with not having to deal with creating a different thread for Unity, that turns out to be false. You need to have a thread running that monitors the incoming traffic.

Setup so far

I created a windows forms solution with 3 buttons, a color picker and a window. The window is just a multiline textbox which catches debug messages. But the 3 buttons for now are used to send 3 different messages to the Unity game.

Reason for choosing named pipe in the first place, was that it was a .net feature that I hoped would be easy to use. It is sort of easy to use, but one thing I forgot was that sending text to another program is easy. However distinguishing between different commands is  not that easy through text.

What I needed to do was to create a packet system. Yes, it sounds dumb, but since you are writing data in the form of bytes, you need to communicate through those bytes. Converting them from and to the data you need.

Packets

This is not set in stone yet, but so far the packet system I created was just an enumeration and a size of the buffer coming in. I set the buffer to be 512, but one of the things I didn’t know  was that the size of the buffer coming in, is the size of the buffer I set. Basically the byte array I get  is 512bytes long, even if I get 12 or 60 bytes of data. So in order to know how many bytes that I need to read I needed to get that information in the header.

The enumeration I wanted there because it is easier to remember that PacketType.MoveLeft is to move left than 0, 1, 2, 3 etc. This distinction makes it easier to also know how to decode the message that comes in.

I have yet to make a package handler, so I need to do that too, but current testing shows that it works to for instance change the background color from a color picker that Windows offers. Which is nice. I don’t know if that is something I will use. All of this is just because I wanted to see how to pass information from one program to another.

So far it works. Unity editor crashes left and right though, but that is I believe more related to the thread that I needed to create in order to constantly monitor the stream. The program that sends stuff is fairly solid, it does crash if it starts up before Unity, but that is a minor fix.

Tips for those who want to test it out

There are two ways to use named pipes. One is with streamwriter and streamreader, the other is doing it without. I had lots of crashes with Unity by testing out the streamwriter and reader. I decided to do it over, and now it works better. Some of the reason however is that I found out that if you BeginWrite, you need to EndWrite. Same with BeginRead, you need to EndRead too. So if you have something that begins, always remember to end it.

Another tip, if you are using threads and you separate them and make them run in a loop in the background, be sure to abort them at the end and also make sure the loop ends. I used that in the deconstructor. That did not work well, use the: OnApplicationQuit method instead. That way when you click the play button again to make it stop, the thread stops since the deconstructor doesn’t run in the editor. At least the loop never stopped unless I put stuff in the OnApplicationQuit method. Can’t explain why, did not research it. Tested it and it worked.

Patience. IT will crash. A lot. Unless you’ve tested it before and know exactly how it works before starting.

Anyway next time I hope to have more to share. I did not share any code, it contains a lot of debug messages, as threaded operations in Unity seems to be harder to debug, so instead there’s a million of Debug.Log messages.

Last tip: Make sure to disconnect the pipe before stopping Unity.

If you want to read more about this though here’s a couple of links that helped me:
https://msdn.microsoft.com/en-us/library/bb384066.aspx
https://msdn.microsoft.com/en-us/library/bb546085(v=vs.110).aspx

Lately I’ve been creating my own projects, because I want to have something to do. I want to be better at programming so I set aside some time to program every day. This way I learn new things. For me it’s not so much what I create, it’s more trying to get a challenge and learning something new.

Previously I made an achievement system for Unity, where I used an SQLite database and used a model of the data to create, update and delete entries. This time around  I decided to create a Windows Form version of the same program. Firstly because I want to see how a non-native-LINQ supported database fares and what the differences might be.

Approaching the problem

Creating something that you’ve done before is always easier the second time around, compared to the first time. This time around I already had graphics that I made for Unity and I had the layout and everything else. So that was the first step, get the layout right. Now I wasn’t very  thorough with the layout, because it wasn’t very important. The important part was getting the data I wanted.

Creating the look in Visual Studio was not that challenging. Getting the buttons for each achievement to be created wasn’t a big issue either. For those who might want to know how that is done, what I did was to have a picture box. Then I put a panel on top which had the dimensions and length I wanted and each of the buttons that spawned had that panel as a control parent and the buttons got their own scroll bar. The result you can see below.

achievementWinForm.png

What Windows Forms does is give you access to the file menu and that helps a lot. Firstly, as opposed to having everything as a button, like for instance reloading and opening up a different database, the file menu is there to do that. So that  is an added “feature”.

The second thing I did was to make sure I could connect to the database. Since the LINQ support for the SQLite libraries didn’t exist, I had to look for how to solve that problem. The solution I found was to use SQL queries instead of LINQ. So I ended up with having to use the SQLiteConnection class, which has a constructor that takes a string that has a Data Source. For me that looked like this:
connection = new SQLiteConnection(“Data Source=.\\..\\..\\Resources\\db.sqlite”);

To be able to use that I needed the SQLiteCommand class, that takes the connection and an sql query string. For instance: “SELECT * FROM ‘AchievementModel'” which runs the query to return all the Achievements. But the SQLCommand does not really run the query, that doesn’t happen until you run SQLReader reader = SQLCommand.ExecuteReader(). Each entry in the table then is made into a dictionary, and in order to get the name, I had to use: string achievementName = (string)reader[“Name”];
Where the [“Name”] is the respective table entry. Since the reader only returns objects, those return values needed to be cast to a different type. After some trial and error, I discovered that the SQLite database only had long as the return values, which was a bit puzzling considering the database I was working with was created with int size variables. Instead of converting all of the data using a conversion that is built-in to C# called unchecked, I decided to just make all the variables that used to be in, into long.

The booleans that I had also was converted into long in the return value, so for those I simply checked if they were zero or one and made a local boolean.

The next step was once I had the data retrieved, I needed to make sure that I could update the data too. Updating as opposed to fetching doesn’t require running a reader, so instead of using:
SQLCommand sqlCommand = new SQLCommand(query);
SQLReader reader = sqlcommand.ExecuteReader();
then loop through the number of rows retrieved. I had to initialize the sqlCommand variable as before, but use sqlCommand.ExecuteNonQuery();
And that would start the update, creation or deletion process. The return value you get is the number of rows updated.

The only thing I really have left on the program is error checking. If a user tries to insert something that already exists into the database. This does exist for Rewards and AchievementGroups, but it is not there for the main achievement. But that is for now fine. The main point was creating a small database driven front end that works without LINQ. That was really what I was going for.

The program was not completed a 100%, but I don’t really had any intention of completely finishing the program. I feel like I have learned what I needed to learn. The rest of the program is about error checking the program. I did make a list of what I need. Basically a check before clicking create, that all the fields are filled in and that the default values aren’t entered (like “Add New Reward” and “Add New Group”). And that if the checkbox unlock achievement is clicked that a value is set. However those things are minor, compared to what I set out to learn.

This to be able to check for null values, empty database etc. Also what is missing is to add a way to insert achievements to the database. I know that’s a major thing to be able to do, but since it is more or less about sending the data you have to the database and just use the SQL query “INSERT INTO ‘Tablename’ (‘column1’, ‘column2’, ‘column3’ … etc) VALUES (item1, item2, item3 etc)”. I already know how to do that, so it’s not learning something new in my opinion.

Going forward

My next project was going to be a simple windows forms with 2 windows. The first window I would have a control mechanism to control the contents of the second window. The problem however is that I wanted to have a way to display hardware accelerated graphics. Windows Forms does not come with a way to control that, it has a thread that runs “internally”, that you can’t get to. And the windows are event based, which means you need to create your own window forms code.

Anyway I’m currently researching the best way to do this. What I am currently thinking is to either start learning node.js and JSON, so that I can use a webbased window and webGL to create what I want. The second option is to have the programs communicate internally through a simple tcplistener. What I want to accomplish is simply to set coordinates in the accelerated window and have that run random effects and transformations and upload images that it can use as a resource and then display that and do simple animations.

I’m leaning towards the networked approach, not because it is the most elegant, it probably isn’t. But more because it would be a nice way to put networking programming in practice.